
The Garmin Alpha 200i has undoubtedly revolutionized the way we track and train our furry companions during outdoor adventures. However, as with any sophisticated electronic device, it’s not without its share of challenges. In this comprehensive blog post, we delve into the most common Garmin Alpha 200i problems reported by users and provide a thorough troubleshooting guide to overcome these issues effectively.
While the Garmin Alpha 200i boasts an impressive array of features and functionalities, its users have encountered certain setbacks that require attention. From GPS signal issues and connectivity hiccups to concerns about battery life and software glitches, we’ll shed light on the various challenges that users have faced with this device. Understanding these problems is the first step towards making the most out of this advanced tracking and training tool.
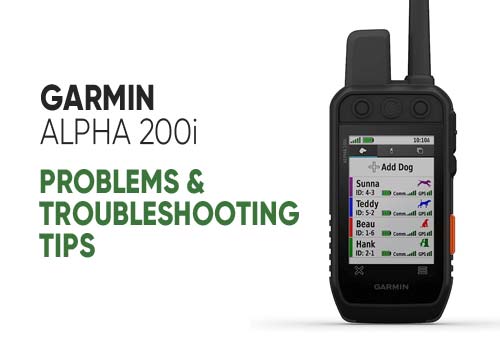
Garmin Alpha 200i Problems and Troubleshooting Guide
The Garmin Alpha 200i stands as a remarkable fusion of advanced technology and outdoor exploration. With its seamless integration of GPS tracking and dog training features, it offers a comprehensive solution for dog owners and hunters alike.
The device empowers users to monitor their dogs’ location and movements in real-time, all while incorporating training functions to enhance obedience and performance. Its rugged design and intuitive interface ensures ease of use in various outdoor environments, while its array of capabilities paints a vivid picture of innovation in the world of dog tracking and training technology.
If you’re having trouble with your device, it’s important to understand what the problem is, and then how to solve it. This guide is designed to help you identify and hopefully fix common problems with your Garmin alpha 200i dog tracker.
It’s important to note that attempting any troubleshooting steps comes with its own risks. If you are uncertain about any aspect of the troubleshooting process, it’s recommended to seek professional assistance or contact the Garmin customer support. Additionally, any actions you take based on the information in this guide are at your own discretion and responsibility.
Garmin Alpha 200i Not Charging
Troubleshooting a Garmin Alpha 200i that’s not charging can involve several potential issues. Follow these step-by-step instructions to diagnose and resolve the problem:
Step 1: Check the Power Source and Cable
1. Ensure you’re using the official Garmin charging cable and power adapter that came with the device.
2. Verify that the power outlet or USB port you’re using is functional by connecting another device.
3. Plug the charging cable securely into both the Garmin Alpha 200i and the power source.
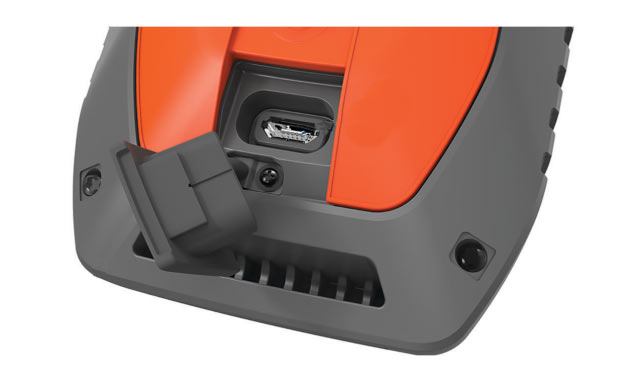
Step 2: Clean the Charging Port
1. Inspect the charging port on the Alpha 200i for any dirt, debris, or damage.
2. If you see any dirt or debris, carefully use compressed air or a small, soft brush to clean the port.
3. Be cautious not to damage the port further while cleaning.
Step 3: Try a Different Cable and Adapter
1. Sometimes, the charging cable or adapter might be faulty. If possible, try using a different Garmin-compatible cable and power adapter.
2. Connect the different cable and adapter to see if the device starts charging.
Step 4: Check for Software Updates
1. Connect your Garmin Alpha 200i to a computer using the charging cable.
2. If possible, check for any available software updates for the device using Garmin’s software update tool.
3. Update the device’s software if there are any available updates.
Step 5: Test Charging on Another Device
1. If you have access to another Garmin Alpha 200i, try using your charging cable and adapter to charge that device.
2. If the cable and adapter work on the other device, then the problem might be with your specific Garmin Alpha 200i unit.
Step 6: Contact Garmin Support
1. If none of the above steps resolve the issue, contact Garmin’s customer support.
2. Explain the troubleshooting steps you’ve taken, and they can provide further assistance, including potential repair or replacement options.
If your Garmin Alpha 200i is under warranty, you should consult the warranty information before attempting any repairs yourself, as opening the device might void the warranty. Always exercise caution when troubleshooting electronic devices to avoid causing further damage.
Garmin Alpha 200i Not Pairing
A number of users have reported facing problems when trying to pair their Alpha 200i with a Garmin dog collar. Garmin Alpha 200i can be paired with up to 20 active dog collars at a time. There are two ways of adding a dog collar to your handheld: a. Adding a dog collar wirelessly, b. Adding a dog collar using track and control codes.
In both the cases, make sure the antenna is attached to the handheld. Also, keep the dog collar and handheld within 10 feet and away from any interferences
Following are some of the solutions you can try to solve pairing issues with your Alpha 200i:
Step 1: Check Compatibility
- Ensure that the dog collar you are trying to pair is compatible with the Garmin Alpha 200i. Here is a list of compatible dog collars:
- Alpha T20
- Alpha TT25
- T 5
- T 5 mini
- T 5X
- TT™ 15
- TT™ 15 mini
- TT™ 15X
Step 2: Power Cycle Devices
- Turn off both the Garmin Alpha 200i and the dog collar.
- Turn on the Garmin Alpha 200i and allow it to fully boot up.
- Turn on the dog collar.
- Check if the devices start pairing automatically. If not, proceed to the next step.
Step 3: Reset Devices
- Check the user manual for the dog collar to find instructions on how to perform a reset.
- Perform a reset on the Garmin Alpha 200i by going to Setup > Reset.
Step 4: Pairing Process
- Turn on Garmin Alpha 200i.
- Put the dog collar in pairing mode by pressing down the power button until you hear two beeps. The collar LED will flash green which denotes it is ready to pair.
- On the handheld, select Dog List > Add Dog > Pair Collar
- The dog collar should appear in the list.
- Select the dog collar from the list to initiate the pairing process.
- Enter your dog’s name and select Finish.
Step 5: Update Firmware
- Ensure that both the Garmin Alpha 200i and the dog collar have the latest firmware updates. Outdated firmware can sometimes cause pairing issues.
- Connect the devices to a computer if needed and use the appropriate software to check for and install any available updates.
Step 6: Contact Customer Support
If none of the above steps resolve the issue, contact Garmin’s customer support for further assistance. They can provide specific troubleshooting steps based on your situation.
How to Hard Reset Garmin Alpha 200i
Performing a hard reset on a Garmin Alpha 200i can help resolve certain issues and return the device to its default settings. Keep in mind that a hard reset should only be done when necessary, as it will erase any personalized settings and data on the device. Here’s a step-by-step guide on how to hard reset a Garmin Alpha 200i:
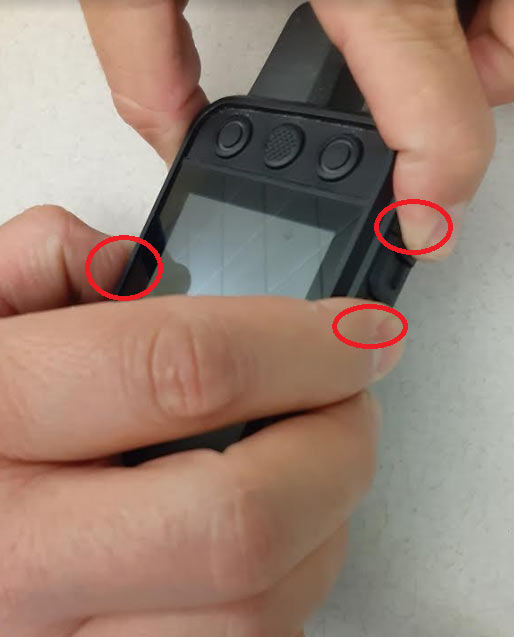
Make sure the Garmin Alpha 200i is turned off. If it’s frozen or unresponsive, try holding down the power button for about 10-15 seconds until the device shuts down.
- Press and hold Scroll Left and Enter buttons simultaneously
- Press the power button while holding the other two buttons.
- Release the power button when you see the Garmin logo on the screen.
- Release the other two buttons when you see the warning message: This will remove all saved user data…..?
- Select Erase to confirm master reset.
- Turn on the Garmin Alpha 200i by pressing and holding the power button for a few seconds.
The device should start booting up. It might take a bit longer than usual as it initializes after the hard reset.
Once the device has booted up, you’ll likely need to go through the initial setup process, similar to when you first got the device.
Follow the on-screen instructions to set up language, location, and other preferences.
If you have backed up your data prior to the hard reset, you can now restore it to the device. This might include waypoints, tracks, and other settings. Refer to your backup procedure to complete this step.
Remember that a hard reset should be considered a last resort when troubleshooting persistent issues with the device. It’s a process that should be performed carefully, as it erases any data and settings you have on the device. If your Garmin Alpha 200i continues to experience problems even after a hard reset, you might need to contact Garmin’s customer support for further assistance.
Compass not working
By integrating real-time compass readings, dog tracking and training devices provide valuable information about the direction your dog is heading, allowing you to better anticipate their movements
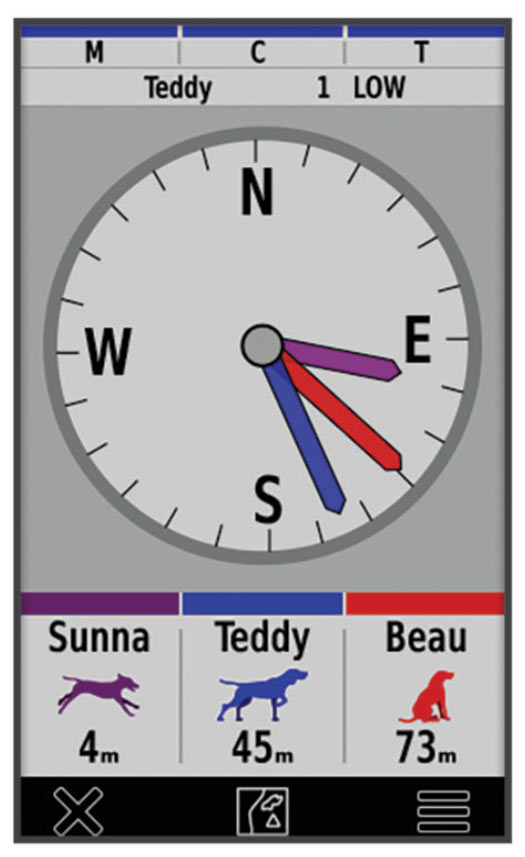
A common problem often faced by Alpha 200i users is that of compass not working. There could be various reasons for this issue. Here are some possible reasons and their corresponding fixes:
1. Calibration Required
A compass requires calibration to ensure its accuracy and alignment with the Earth’s magnetic field. When you calibrate a compass, you’re essentially teaching it to recognize the local magnetic field’s unique characteristics. This ensures that the compass accurately points to the true north, allowing you to navigate with confidence.
To calibrate the compass on a Garmin Alpha 200i :
- Go to Main Menu and select Compass.
- Select Menu icon denoted by three dots and select Calibrate Compass
- Select Start and follow the on screen instructions to perform calibration
2. Magnetic Interference:
Magnetic interference from nearby objects like metal, electronics, or power lines can affect compass accuracy. Move away from such interference and try using the compass again.
3. Software Glitch:
A software glitch could be causing the compass to malfunction. Try restarting o resetting the device:
1. Turn off the Garmin Alpha 200i.
2. Wait for a few seconds.
3. Turn it back on and check if the compass is working.
4. Magnetic Deviation:
Magnetic deviation can occur due to factors like the presence of metals or electronics in the device itself or your environment. In this case, consider recalibrating the compass in different locations and orientations to get an accurate reading.
5. GPS Signal Issues:
Sometimes, GPS signal issues can affect the accuracy of the compass. Ensure you have a strong GPS signal before relying on the compass.
6. Firmware Update:
Make sure your Garmin Alpha 200i has the latest firmware update. An outdated firmware version might cause compass inaccuracies. Connect the device to Garmin Express on your computer to check for updates.
7. Environmental Factors:
Environmental factors such as high electromagnetic interference, mountains, or thick forests can affect compass accuracy. Move to a more open area away from potential interference.
8. Hardware Issue:
If none of the above solutions work, there might be a hardware issue with the device’s compass. In this case, you should contact Garmin’s customer support for further assistance or to explore repair options. They can provide specific troubleshooting steps based on your situation or guide you on any potential repairs that might be needed.
Birdseye not showing Land owners information
BirdsEye is a premium satellite imagery subscription service offered by Garmin. It provides users with high-resolution aerial and satellite imagery that can be loaded onto compatible Garmin devices.
If Birdseye imagery doesn’t show landowners’ information on your Garmin Alpha 200i, it might be due to a few reasons.
Landownership data often depends on the specific maps you’re using and the availability of this information in your region. Here’s a step-by-step guide to help you troubleshoot and potentially fix this issue:
1. Check Map Source:
Ensure that the Birdseye imagery you are using actually includes landowners’ information. Not all map sources or versions include this data, so check the product description or documentation to confirm if landownership details are part of the maps.
2. Update Maps:
Make sure you have the most up-to-date version of Birdseye imagery installed on your Garmin Alpha 200i. If you’re using an older version, it might not include the latest landownership information.
a. Connect your device to a computer.
b. Use Garmin Express to check for available map updates and install them.
3. Map Layer Settings:
Check the map layer settings on your Garmin Alpha 200i. The landowners’ information might be on a separate layer that needs to be enabled.
1. Go to the map screen on your device.
2. Look for options related to map layers or overlays.
3. Ensure that the appropriate layer containing landownership data is turned on.
4. Map Detail Level:
Sometimes, landowners’ information might only be visible at certain zoom levels or map scales. Try zooming in or out on the map to see if the landownership data becomes visible at a different scale.
5. Verify the Map Data:
If you’re sure that the Birdseye imagery you’re using should include landowners’ information, but it’s still not showing up, double-check the map data by:
1. Ensuring you have the correct map region selected for your area.
2. Verifying that you’ve downloaded the right Birdseye imagery set that includes landownership information.
Garmin Alpha 200i not Powering On
The issue of the Garmin Alpha 200i not powering on could arise due to various factors. It might be attributed to a drained battery, software glitches, or even hardware malfunctions. Troubleshooting steps encompass checking the battery’s charge level, attempting a soft reset, and ensuring proper connections to power sources before considering professional assistance or device evaluation.
Here’s a step-by-step troubleshooting guide to help you identify and potentially resolve the problem:
Step 1: Check the Battery:
1. Ensure that the battery is properly inserted into the device and securely locked in place.
2. If the battery is low or depleted, connect the device to a power source using the appropriate charger and cable. Leave it to charge for a while before attempting to turn it on.
Step 2: Power Source:
1. Ensure that the charger and cable you’re using are working properly. Try using a different charger and cable if possible.
2. Connect the device to a power source (wall charger or computer USB port) and wait for a few minutes to see if the device responds.
Step 3: Inspect for Physical Damage:
1. Check the device for any signs of physical damage or water exposure. If you find any damage, it might be preventing the device from turning on.
2. If the device has been exposed to water, it’s possible that it needs to dry out before it will function properly.
Step 4: Update Firmware:
1. If possible, connect your Garmin Alpha 200i to a computer and use Garmin Express to check for firmware updates.
2. Install any available updates to ensure your device is running the latest software version.
Step 5: Check for Screen Display:
1. If the device seems unresponsive but you’re not sure if it’s turned on, try looking for any signs of the screen lighting up or displaying information.
2. If the screen is showing any signs of life, the problem might be related to the display rather than the device not turning on.
Step 6: Contact Garmin Support:
1. If none of the above steps resolve the issue, it’s recommended to contact Garmin’s customer support.
2. They can provide specific troubleshooting steps based on your situation, or guide you on potential repair or replacement options.
Remember that attempting any complex repairs yourself might void the warranty or potentially cause further damage. If your Garmin Alpha 200i is under warranty, it’s best to consult the warranty information and contact Garmin’s support for professional assistance.